Sunday, November 21, 2010

My first wedding cake


My little brother got married a few weeks ago. Back when they first set the date his fiance asked if I would make their wedding cake. I was honored that they even asked me to think about making the cake for them. I don't have any pictures of the inside of it but it was a white cake with a strawberry whipped cream filling that I sort of threw together. (My original plan was to make a strawberry filling-almost like a compote-but it was too loose. So I whipped some cream and added my strawberry simple syrup with some macerated whole strawberries)
I knew going in to it that baking a wedding cake would be stressful so I took the Friday before the wedding off from my normal job to dedicate to the cake making. I had a couple of mini-meltdowns when things weren't going the way that I wanted to but thankfully my good friend Kate was there to talk me down and cheer me on.
This is the only picture that I was able to get-from my iPhone no less-of the cake. My brother hasn't gotten the prints/disc from the photographer so instead of waiting on him I decided to go ahead and post the one that I had.

Wednesday, October 13, 2010

A confession...

I have a confession...I love all things pumpkin. Pumpkin pie, pumpkin bread, pumpkin cheesecake and the list goes on and on. Basically, if it contains pumpkin I will most likely love it. So the other day while at the Pioneer Woman's blog I saw this on her scrolling homepage and had to check it out: A Tasty Recipe: Pumpkin Creme Pie. I immediately printed it out and decided that I would have to try it at some point this week. I was so excited to try this that I came home from work and after fixing dinner for the family I set about to make these. And let me tell you something, they are super yummy. I know that I say that everything is yummy but these are no joke. I followed the recipe as it was written instead of tweaking it. My only complaint about the recipe was/is that it only made enough to have about 12 creme pies. Which is nowhere near enough for us. Even my husband, who doesn't care for anything pumpkin related, said that these were really good.


I'm not going to copy the recipe here because you can just click the link above and it'll take you right to it.


Here's my finished product:


Sunday, October 3, 2010

Lemon Squares

Let me begin this post by apologizing for my lack of posting lately. It's not that I haven't been baking-because I have-it's just that I haven't been baking anything new/not from a box. Last night changed that though. I've had some lemons sitting around for a few days and my husband's kept asking when was I going to make some lemon squares so in between football games yesterday afternoon I made these.
I typically don't care for anything lemon related and every time I make a batch of lemon squares I taste them and every time I say the same thing: "yep, still don't like them". However, yesterday was different. After I took these out of the fridge and tried a bite of one of my husbands I had a change of heart. Something about this batch was different and they turned out really good.
Lemon Squares (recipe courtesy Emeril Lagasse 2004 via Food Network website)

Ingredients:

1 3/4 cups all purpose flour
1/2 cup confectioners' sugar plus extra for dusting
1 1/2 sticks unsalted better cut into pieces
4 large eggs
1 1/2 cup granulated sugar
2/3 cups freshly squeezed lemon juice (I used the juice of 3 lemons and then added lemon juice for the remainder)
1 tablespoon finely grated lemon zest
1 teaspoon baking powder
pinch of salt

Directions:

Preheat oven to 350 degrees F

Line a 9x13 inch sheet pan with aluminium foil

In a bowl combine 1 1/2 cups of the flour with 1/2 cup of the powdered sugar. Cut in the butter until the mixture resembles fine crumbs. Press in an even layer into the bottom of the pan and bake until pale tan, about 20 minutes. Reduce the oven temperature to 325 degrees F.

While the crust is baking prepare the filling. In large bowl beat the eggs and granulated sugar until pale yellow and frothy. Add the remaining 1/4 cup of flour and the remaining ingredients and combine. Pour over the warm crust and bake until set 20-25 minutes.

Cool completely on a wire rack. Dust with confectioners' sugar before cutting with a sharp knife in to squares.

Monday, September 13, 2010

White Chocolate Chip/Macadamia Nut Cookies


I have been craving these cookies for almost a month now and I finally got around to baking some last week.

I took the recipe from a baking cookbook that my grandma gave me a couple of years ago. I had to play around with it a little to make it suit my tastes.

I normally use the recipe off of the bag of Ghiradelli White Chocolate Chips but I only had Toll House white chocolate chips this time and their recipe seemed a little bit strange to me.

I'll share the recipe as it was originally but I'll let you know how I modified it too.

From the All New Bake Sale Cookbook

1 package (12 ounces) white chocolate chunks, divided (I used two bags of white chocolate chips)
1 3/4 cups flour
1 1/2 flake coconut, toasted (I left the coconut out completely)
3/4 teaspoon baking soda
1/4 teaspoon salt
1/2 cup (1 stick) butter or margarine, softened
1/3 cup firmly packed brown sugar
1 egg
1 teaspoon vanilla
1 cup chopped macadamia nuts

Heat oven to 375F

Microwave 1 cup of the chocolate chinks in microwaveable bowl on high 2 minutes until almost melted. (I used 1 whole bag for this step) Stir until chocolate is completely melted; cool slightly. Mix flour, coconut, baking soda and salt in medium bowl; set aside.

Beat butter and sugar in large bowl with electric mixer on medium speed until light and fluffy. Add egg and vanilla; beat well. Stir in melted chocolate. Gradually beat in flour mixture. Stir in remaining chocolate chunks (I used the whole second bag) and nuts. Drop by heaping tablespoonfuls onto ungreased cookie sheets.

Bake 11 to 13 minutes or until just golden brown. Cool on cookie sheets 1 minute. Remove to wire racks and cool completely.

*Here's my $.02 worth of opinion about these cookies*

Honestly, they weren't my favorite. Not exactly a swing and a miss but not a home run either. The cookies were a little firmer than I like my cookies to be and they were chewy, except when warm. The Ghiradelli recipe doesn't have you melt any chocolate and add it to the batter. You just use the bag of chips. Maybe that made a difference. I won't know unless I try this recipe again and tweak it some more.

Tuesday, September 7, 2010

Paula's Pumpkin Bread


Have you ever read one of Paula Dean's magazines? I've got a subscription to it and it's one of those magazines that literally has me checking my mail box waiting for the next issue. A couple of weeks ago I got September/October issue in the mail. Of course there are lots of recipes for dinners for a nice cool evening, not that we get many of those is October/November in Florida but a girl can dream. There was also a section on taking your regular bread recipes and giving them a makeover. I was really interested in the recipe for pumpkin bread because I haven't found one that I loved. I really like the way that this bread turned out. It's a little dense and really moist and goes really, really well with a big spoonful of whipped cream on top of it.

I was going to link directly to the recipe on the magazine website but this issue isn't out on newsstands yet so it's not available on the website. (at least not that I could find) I did find another recipe from 2007 for pumpkin bread on the website but it differs from the one I've got. To make your life easier I'll go ahead and put it here but if you've got the magazine it's on page 77. I did tweak it a little bit to suit my taste but feel free to follow it to the letter, or not.

Pumpkin Bread from Sept/Oct issue of Cooking with Paula Deen 2010

Makes 2 loaves

Ingredients:

2 1/2 cups pumpkin puree
4 large eggs
1/2 cup vegetable oil
2/3 cup water
3 1/2 cups all purpose flour
3 cups sugar
2 teaspoons baking soda
1/2 teaspoon salt
1/2 teaspoon ground cinnamon
1/4 teaspoon ground nutmeg
1/4 teaspoon ground cloves

1. Preheat oven to 350 F. Spray 2 9x5 inch loaf pans with cooking spray.
2. In a large bowl, combine pumpkin, eggs, oil and water. In another large bowl combine flour, sugar, baking soda, salt, cinnamon, nutmeg and cloves. Gradually add flour mixture to pumpkin mixture, stirring until blended. Pour batter evenly into prepared pans. Bake 45 minutes or until a wooden pick inserted in center comes out clean. Cool in pans on a wire rack 15 minutes. Remove from pans and cool completely on wire rack.

*My thoughts*
I bet that you could use pumpkin pie spice instead of the three listed spices. I'd venture to guess that a teaspoon or a teaspoon and a half would be sufficient.

I thought that this recipe was really great. It wasn't crumbly or too dense. It was just perfect. I bet it'd be great with a cup of warm apple cider or something.

Hello Florida? It's Melissa. Would you mind cooling down some so that I could have this bread every day? I'd appreciate it and love you forever. Thanks.

Tuesday, August 31, 2010

Yummy in your tummy banana nut bread!


Last week a few of mine tweeted about the heavenly smell of banana bread baking in their kitchen (ahem, Kate!). I decided that I would make some banana bread as soon as I got home from work since I already had some ripe bananas that I needed to use. I ended up making five loaves of banana nut bread within a couple of days.

Here's my recipe:

Ingredients

2 cups all purpose flour
1 teaspoon salt
1 teaspoon baking soda
1 cup (4 sticks) butter or margarine
2 cups granulated sugar
2 cups mashed ripe bananas
4 eggs
1 cup (I don't actually measure) chopped walnuts

Directions

Preheat the oven to 350 degrees. Grease two 9x5 loaf pans

Sift the flour, salt and baking soda into a large bowl. In a separate bowl mix together the butter and sugar until smooth. Stir in the bananas, eggs and walnuts until well blended. Pour the wet ingredients in to the dry mixture and stir until just blended. Divide the batter between the two load pans.

Bake for 60-70 minutes in the preheated oven. Let the loaves cool in the pans for at least 5 minutes, then turn them out on to a cooling rack and let cool completely. Wrap in aluminium foil to keep in the moisture. Ideally, you'll want to refrigerate the loaves for a few hours before serving.(Pardon my uneven slicing. Apparently my cutting skills leave a little something to be desired.)
Let me share a little secret with you about my method for mashing the bananas. I used to enlist the help of my son because I didn't want banana all over my fingers. Since he's 9 now, he's not as willing to come help me with my banana situation. What I've discovered is that I can toss my bananas in the food processor and pulse it for a bit and ta da, I've got mashed bananas and minimal mess on me.

Additionally, you could use whatever nuts you prefer in this recipe. I usually have walnuts on hand so I tend to use them. You could use pecans or some other nut if you don't have walnuts, though. I also usually toss in a splash of vanilla extract but you don't have to add it if you don't want to. I happen to like vanilla in most baked goods.

Saturday, August 28, 2010

Have you ever had a loofah?


In our house this is called "The Loofah". Yes, I know that it's technically a trifle. The term loofah came about when I first made this my husband couldn't remember what it was called so he dubbed it "the loofah". And after ten years, it's stuck. All of the people at my work have taken to calling it the loofah as well. I've switched up the flavors in it a few times, always with positive results.
Here's how I put it together:
Ingredients:
1 family size box of instant chocolate pudding
1 box of brownie mix (plus the ingredients to make it according to box directions)
2 tubs of Cool Whip (thawed)
2 pints of strawberries
To make:
Mix up the brownies according to the package directions. I usually use the Betty Crocker bag brownies-I just use two of them to have enough brownies. While the brownies are cooling, prepare the chocolate pudding. Make the pudding according to the package directions and put it in the fridge and wait for it to set up. Take this time to slice up the strawberries. I just cut the tops of them and either slice/quarter them. Take the pudding out and add one tub of Cool Whip to the pudding. Fold the Cool Whip in to the pudding until it's all combined.
Get your pedestal bowl out. Take pieces of brownie and put them in the bottom of the bowl. Spoon some of the chocolate pudding mixture and put it on top of the brownies. Now put some of the strawberries on top of the pudding. I usually end up with two layers, with strawberries being on top. Take the second tub of Cool Whip and put it on the top of the strawberries. And that's it! I usually make it the night before I need it that way the pudding has time to sink in to the brownies and soften the strawberries some. I keep one or two strawberries whole to put on top for a garnish.
The last step would be to eat and enjoy!

Saturday, August 14, 2010

Whatcha' been up to?

This is part of what I've been up to this morning.

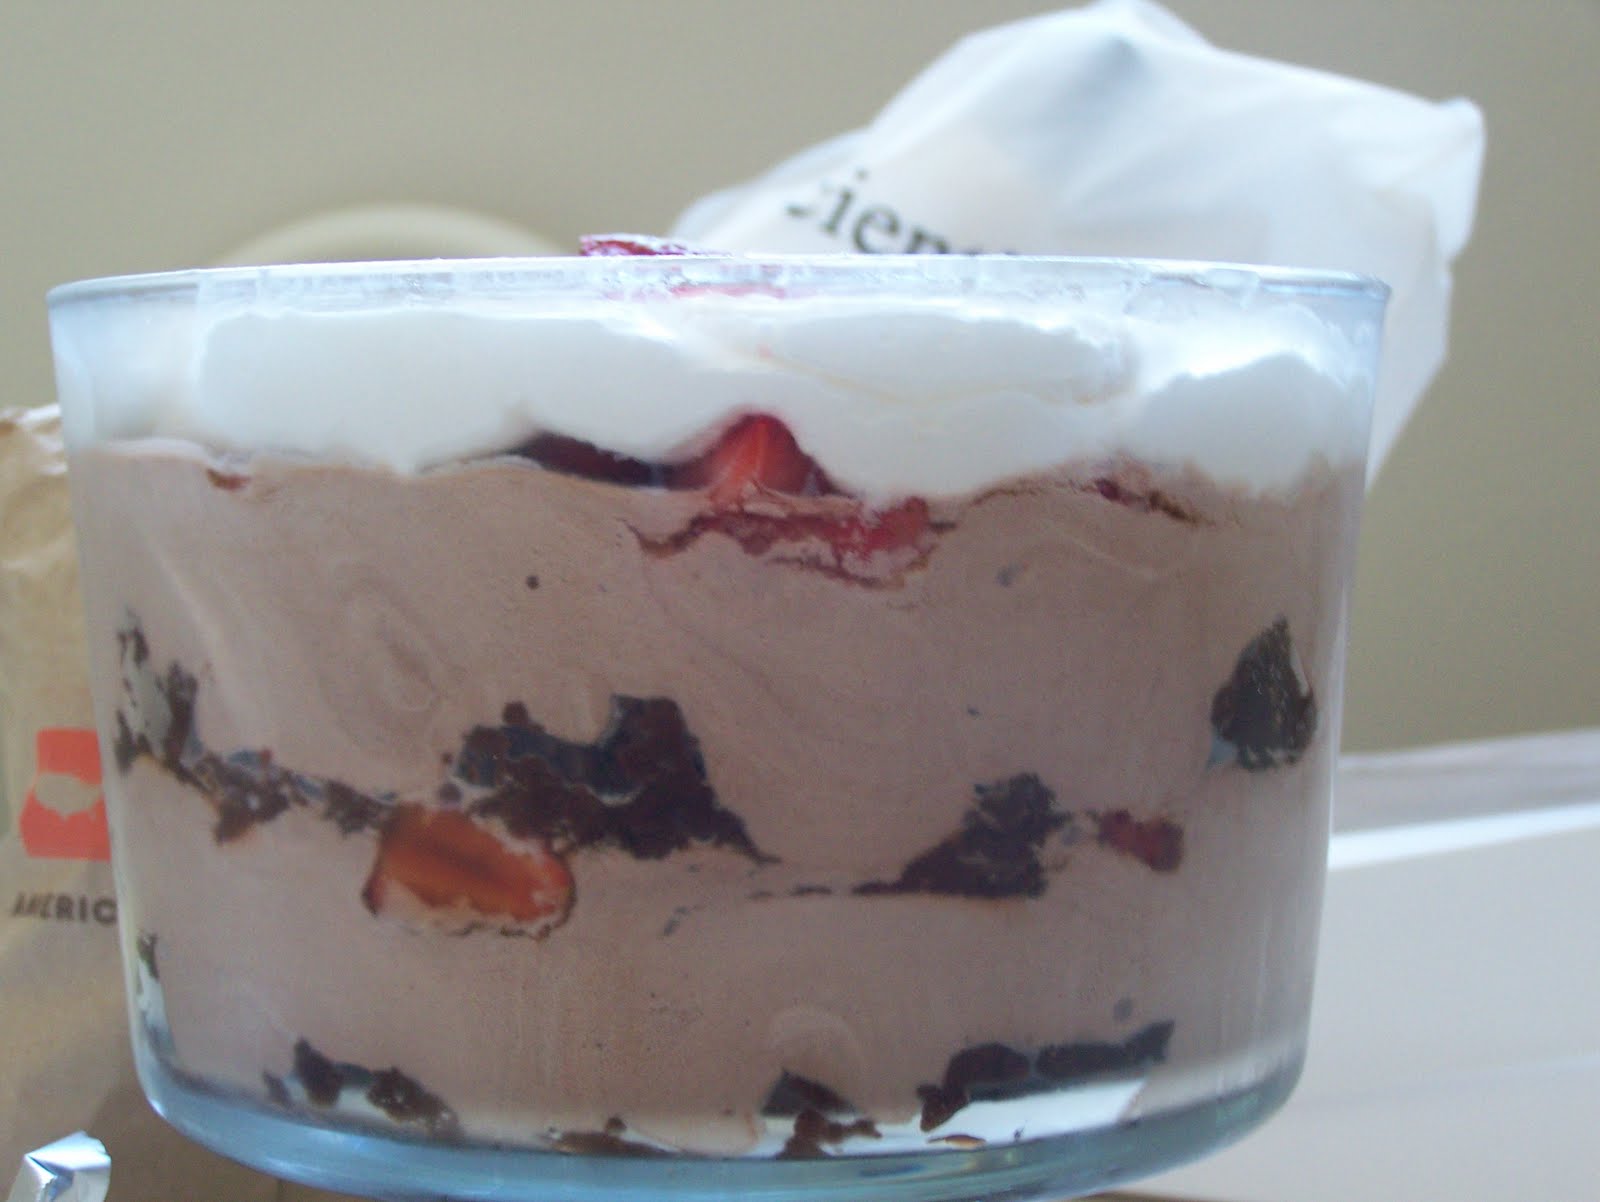
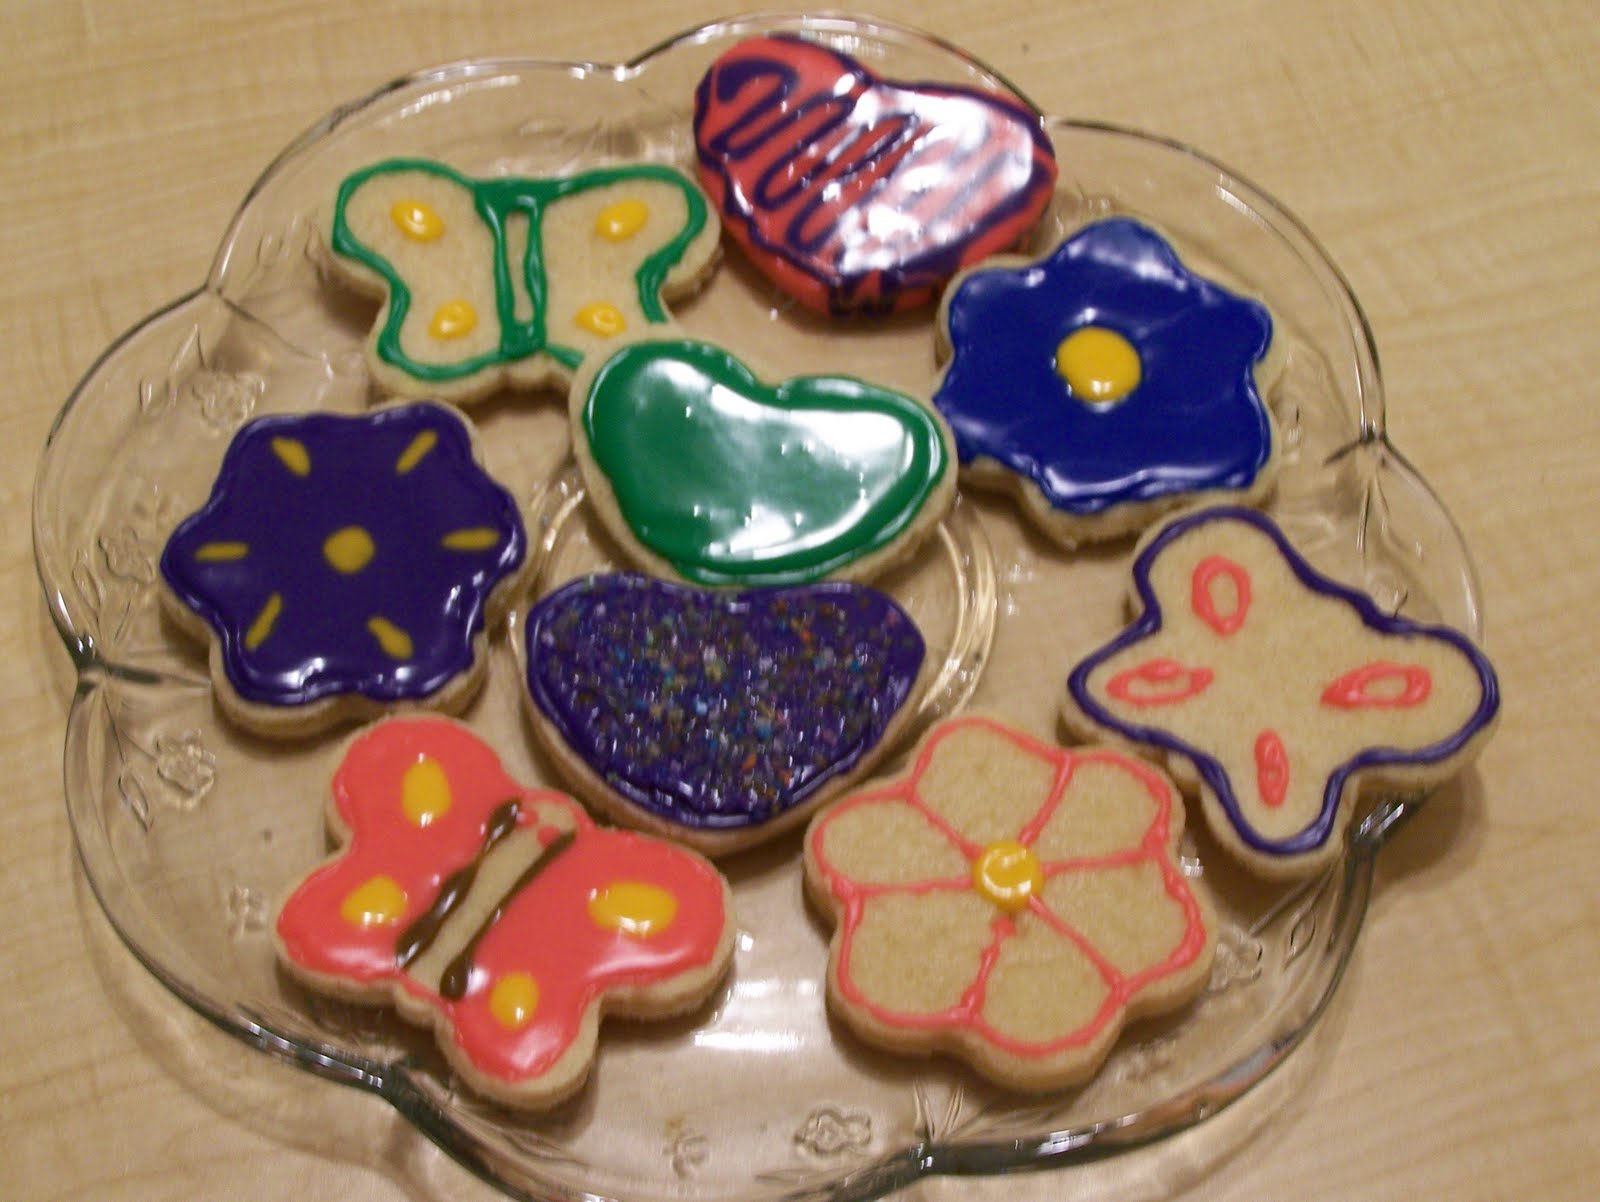
This is the second part of what I've been up to this morning.

This was the end result. And it's all gone now!


Sunday, August 1, 2010

Mini Cherry Cheesecakes


Friends-this is a miniature cherry cheesecake. If you're in to cherries or cheesecake or maybe both then you will love these little guys. I was craving something sweet the other day so I decided to make some of these to satisfy my sweet tooth. I normally make these in a smaller size (these are the size of regular cupcakes, I typically use my mini-cupcake pan though) but was out of mini cupcake liners.


Ingredients for the filling:

2 8 ounce blocks of cream cheese
3 eggs
3/4 cup granulated sugar
1 teaspoon vanilla extract
1 capfull of lemon juice (you can use imitation or the real stuff)

Ingredients for the crust:
Half of a bag/box of vanilla wafers
A couple tablespoons of butter/margarine

Topiing:

1 Can of cherry pie filling (or whatever fruit filling you like)

Directions: (this is so easy that the kids could do it, I promise!)

Preheat your oven to 350 F. Line your cupcake pan with cupcake liners-or you could grease them if you don't have any liners. Put the vanilla wafers and the butter in the food processor. Turn it on medium for 30 seconds-1 minute or long enough to get a crumb like consistency. Take a spoonful of the crumbs and place in the bottom of the liners in your pan. Use your fingers to push everything down firmly. Set aside.

At this point I take whatever crumbs are left and put them in a resealable plastic container in the fridge for next time. Take this opportunity to wash the bowl of your food processor, you're going to need it for the next step.

Take all of the filling ingredients and put them in the bowl of the food processor. Turn it on for about 2 minutes-or until you have a creamy, thick, smooth consistency. Take a spoon and put a couple of spoonfulls on to the crusts in your pan. Put the pans in the oven for about 12 minutes depending on your oven. When they cheesecakes are done they will be a little poofy on top but not jiggly. If they're still jiggly leave them for another minute or two. Take them out and set them on a cooling rack for about 5 minutes. After 5 minutes just take them out of the pans and leave them on the rack.

When they're completely cooled put them in a storage container. Take a spoonful of your pie filling and top the cheesecakes. Now for the hardest part-put them in the fridge for a couple of hours. After a couple of hours in the fridge-they should look like this:


They are so yummy! It's very hard to only eat one or two or six at one time!!

Wednesday, July 28, 2010

Yummy Snickerdoodle Blondies

I found this recipe online a couple of weeks ago but I hadn't had the time to try it until last night. Oh my, did these blondies turn out yummy.


Here's the recipe (I adapted it a little bit to suit our tastes):

Ingredients:

2 2/3 cups All-purpose flour
2 teaspoons baking powder (although I only used about 1 1/2 teaspoon)
1 teaspoon cinnamon
1/4 teaspoon grated or ground nutmeg
1 teaspoon salt
2 cups packed brown sugar
1 cup butter at room temperature
2 eggs room temperature
1 tablespoon vanilla extract

For the topping:
2 tablespoons granulated sugar
2 teaspoons cinnamon
a pinch of nutmeg

Directions:

1. Preheat oven to 350 degrees F. Lightly grease and/of line a 9x13 inch pan. Combine the flour, baking poweder, cinnamon, nutmeg and salt and set aside.
2. In large bowl, beat together butter and brown sugar for 3-5 minutes. Add in the eggs ones at a time, then the vanilla and beat until smooth.
3. Stir in the flour mixture until well blended. Spread evenly in prepared pan. Combine the granulated sugar, cinnamon and nutmeg in a small bowl. Evenly sprinkle cinnamon sugar mixture over the top of the batter.
4. Bake 25-30 minutes or until surface springs back when gently pressed. Cool before cutting.
I can't express how much these "blondies" taste like a snickerdoodle cookie. When I make these again when I make the topping I'm going to cut the sugar and cinnamon in half. I found that it was a little overpowering for me. I don't know how it will affect the overall taste of the blondies so I'm going to have to tweak it a little bit.
Now run, don't walk to your kitchen and get these blondies in the oven! You'll thank me, I promise.

Sunday, July 25, 2010

A tale of the cake with multiple personalities...


This is a cake. However, it's not just any ordinary cake. This cake has a special story to tell. There are multiple sides to this story. Let me share them with you:


This is the other side of the story.

How did this come to pass? Well, it's like this. My younger brother will be getting married in October. His fiance asked if I'd be willing to make their wedding cake. I, of course, said that I'd love to make the cake. I'm honored that they would even consider having me make their cake because I'm certainly not a professional baker. But, on the other hand I'm terrified. It's not like this is a birthday cake that no one will remember in the future. A wedding cake is a very big deal.

I told my sister-in-law-to-be that I'd make a couple of practice cakes, that way she could get a feel for what it will actually look like before hand. Originally she had told me that she wanted a round cake decorated in lavender. Then last week she told me that she had changed her mind and that she wanted it to be white on white. I decided that for the first practice cake I'd decorate the cake both ways so that she could decide which style/color she liked best.


That's the end of the story, folks. In an effort to make life a little easier I combined the two ideas to have a side by side comparison. Now, you know how we came to have the cake with multiple personalities.


Tuesday, July 20, 2010

Another day, another cake.


This weekend we celebrated our daughters 11th birthday. Her only request for her cake was that it be a chocolate cake with vanilla icing. We've had a lot of chocolate cake lately and I think that every one's getting tired of it. After I baked the cake and iced it (I totally cheated and used a store bought icing and a box cake mix) I felt that it looked a little plain and boring. Then I had the brilliant (not!) idea to try my "new to me" design with a couple of different icing colors. Jayna is a very girly-girl and loves all things pink and purple so I figured that I'd use those two colors to decorate the cake. Unfortunately, since I was using a whipped store bought icing it was very thin and didn't want to hold it's shape very well when I was trying to make the loops and squiggles on the side(s) of the cake. When Jayna saw it for the first time she said that it was beautiful and that she loved it, so my mission was accomplished. I personally wasn't happy with it because of the issues with the icing but it still looked presentable.
My latest issue that I'm having with my cakes is that even after I level the tops I still can't get them to stay flat once I start putting icing on them. Any suggestions, tips, etc to prevent having the top and sides be unevenly iced?

Wednesday, July 14, 2010

Sugar cookies are dead to me!


The above picture is photographic evidence that sugar cookies hate me. I think that this will be my last attempt at sugar cookies for a long time.
Don't get me wrong-the cookies themselves were tasty. It's the decorating part that has left me so frustrated. I had this grand idea in my head and for whatever reason I wasn't able to get that to translate on to a cookie.
I made the icing on the 4th because at the last minute I decided that I wanted to bring some cookies to the family barbecue. I ran out of time on the 4th so I just tossed the royal icing in to the fridge thinking that I'd get back to it within a day or two. Here we are now, almost three weeks later.
I didn't follow a specific recipe when I was making the royal icing. I sort of threw the ingredients in to a bowl. For some reason whenever my royal icing dries it dries really, really shiny. It must be the Karo syrup that does that but I'm not certain.
I made about three dozen cookies and only decorated about ten of them. They weren't coming out the way that I wanted and as I messed with them I got more frustrated. So, unfortunately I won't be quitting my day job to decorate cookies full time. It's official-I'm calling it quits with the idea of decorating beautiful cookies for people. I'll leave it to the pros from now on.

Saturday, July 3, 2010

Bridal Shower Cake


Today I had the pleasure of attending a bridal shower for a lovely young woman from my church. One of my friends was organizing the shower and had asked me several months ago if I would mind making the cake for her. Of course I told her that I'd be happy to do it. I had her give me an idea of what the colors/theme were going to be for the shower so I would know what direction to start thinking. She sent me a text message with a picture of the plates with the reassurance that I had no creative boundaries and I could make whatever kind of cake I wantedflavor/design-wise.

She was planning on only having around 15-20 women at the shower so I didn't think that making a 8 or 9 inch cake would be enough to feed everyone. (I have serious issues with always thinking that there won't be enough cake for everyone) I decided to do a rectangle shaped cake and then just make three or four layers . Since I don't have professional/industrial size cake pans I used my handy dandy 9x12 glass casserole pan. I made the layers in batches because not all of my 9x12 pans are the exact same shape and I didn't want to have to cut the cake to make it uniform on all the sides. I used a boxed cake mix and made my own icing for in between the layers and on the outside.


We ended up with a chocolate cake with chocolate buttercream icing and then a regular white buttercream icing on the outside. To decorate the cake I tried something that I've never done before and I don't even know what the technical term is for what I did. I'll have to let the pictures speak for themselves. Overall I was really pleased with the way that the cake turned out.


The bride to be was very happy with the look/taste of the cake. I was so relieved that she liked it! Everyone else at the shower loved it as well. For some reason I always think the worst about the things that I bake. No one wants their cake to be the one that everyone talks about afterwards because it was so nasty or looked like garbage or whatever. I'm trying to work on that. I think that more experience I get the more confidence I'll have. I think that I'll probably continue decorating cakes this way because it really gives you freedom to use different colors, etc. Plus the style lent itself really well to me being a first timer and worried that I was going to mess it up.

This last picture is of the cake on the table at the shower. To the right are the napkins that I got my inspiration from. It's kind of hard to tell in this picture but I had put black dots all along the bottom of the cake to bring in the black from the napkins.

Sunday, June 13, 2010

M&M Cookies

On the agenda for today was making some chocolate chip cookies. After having so much cake during the past couple of weeks I was ready for something different. This recipe is a tried and true favorite in my home. Whenever my husband wants me to make them he'll ask me "when are you making MY cookies?" I automatically know which ones he's referring to!

Here's the cast of characters:

2 sticks (1 cup) room temperature butter
1/2 cup vegetable shortening
3/4 cup granulated sugar
1 3/4 cups firmly packed brown sugar
3 large eggs
1 teaspoon vanilla extract
3 3/4 cups all purpose flour
1 teaspoon baking soda
1 teaspoon salt
1 (12 ounce package) semi-sweet chocolate morsels
1 bag of M&M baking chips
1/2 bag of dark chocolate chips

Internet meet Bertha. Bertha this is the internet. Bertha has become my very best friend in the kitchen. I use her all the time because I love her so much and I don't want her to feel neglected. I wanted this mixing for the first 8.5 years of my marriage. She wasn't cheap which is why I had to wait so long to get her. My husband surprised me with her last spring and life has been wonderful ever since!
Okay, enough about Bertha. I just wanted to properly introduce her to you. Now we can make some cookies.

Preheat your oven to 375 F

With an electric mixer beat butter and shortening until creamy.

Gradually add sugars, beating well until fluffy.

Gradually add dlour, baking soda and salt to butter mixture beating until well blended.
Pour your chocolate chips and M&M's in to the mixing bowl.

Gently stir in the chocolate chips and M&M's. The goal here is to not break up the M&M's. You still want them to have a definable shape.
I use a rounded tablespoon to put the cookies on the prepared cooking sheets about 2 inches apart.
Bake for about 10 minutes until lightly browned. (you know your oven best-so shoot for ten minutes but if you're oven runs a little warmer shorten in by a minute or two)

Let cool for 2 minutes on baking sheet then move to wire racks to cool. If you look at the above two pictures you may notice something different. Someone couldn't wait for the cookies to cool (ahem, Honey!) so the second picture is missing a cookie. You'll want to let them cool for ten or fifteen minutes before you try moving them around because the chocolate chips will still be warm and will get gooey if you stack them etc.
Here's our final product:

This recipe is really versatile. If you don't have M&M's you could use another kind of chocolate chip, butterscotch chips, peanut butter chips, toffee pieces or anything else that floats your boat. I don't care for milk chocoalte-I'm a dark chocolate kind of girl but you could use milk chocolate and semi-sweet chocolate. Feel free to mix it up and do whatever works for you.

Sunday, June 6, 2010

How not to make a Bakugan cake

Warning: Incredibly long, drawn out cake drama below.

Where do I begin with this tale of heartache and pain? Hmmm...I guess the beginning is the best place to start the story. My baby boys 9th birthday is this Tuesday. We had his party this weekend. He told me several weeks ago that he wanted me to make his cake and that he'd like for me to try to make the cake in the shape of a Bakugan ball. Side note-apparently Bakugan are all the rage with the 8-10 year old boys. I don't understand it but I'm not a 8year old or a boy. I told him that I'd do my best to make the cake that he wanted. At this time I'd like to blame Ace of Cakes for making this whole idea seem so easy to make a reality. I'd been thinking about the logistics of making a round ball shaped cake. I knew that I wouldn't be able to carve it because my artistic skills rank in the negative numbers. I finally came to the conclusion that my best bet would be to bake the cake in a round Pyrex bowl and then assemble it from there in order to get a ball shape. I wanted to do a practice run with the cake during the week since the party would be on Saturday to be sure that it would turn out. Well, this week got away from me-I blame the 3 day weekend-and I wasn't able to test run my ideas until Friday night.
Wyatt and I were out doing some last minute running around Friday night and I asked him how he wanted the outside of his cake to look. Leave it to my son to tell me that he wanted a fondant covered cake. I did what any other loving mother would do and told him that I'd try to make it happen. I had found a recipe for homemade fondant on Amanda's blog (http://iammommy.typepad.com/i_am_baker/) and thought that I'd try that. I'll admit it here in the privacy of my own blog that I'm cheap. If I can make something as opposed to buying it I will do so in a heartbeat! I've priced fondant before because I've wanted to get some to play around with and see what I can do with it and I haven't bought it because I think it's kind of pricey. I weighed the price of the pre-made fondant versus the homemade and figured that the taste of the homemade would be better and worth the extra effort. Fast forward to almost 10pm Friday night-once we get home and eat dinner. I get the cakes in the oven with no problems. After looking at the Pyrex bowl I was using I didn't think it would be round or ball shaped enough so I added a 9 in round cake pan to the oven to even out the size of the ball. As I'm getting the cakes out of the oven I read over the recipe for the fondant. Crap!!! It's supposed to be refrigerated overnight or at least for a few hours. It's late but I decided to soldier on. I was determined to give my boy the cake that he wanted. So I'm assembling the ingredients for the fondant and guess what I don't have any of because I used it last weekend during the cake-a-palooza?? Yup, I'm out of powdered sugar. It's 11:45pm. Some people might have decided to give up-not me. The rest of my family went to bed as I ran to Wal-mart to get more powdered sugar. While I was at Wal-mart I decided to venture over to the craft department and look at the cake decorating stuff. Meanwhile I'm mentally going back and forth with just buying the fondant or making it myself. I grabbed the box of fondant and go to walk out. Right then it happens. Mothers, you might know what I'm talking about....Mommy guilt. And it killed me. I put the pre-made fondant back and grabbed the powdered sugar and left Wal-Mart. When I got home I finished making the fondant and put it in the fridge to do it's thing. At this point it's about 1am. I'm tired. Ready to go to bed. But my baby boy will have no cake if I don't do something. So I start assembling the cake. I didn't want to use dowels for support mainly because I didn't think that they'd work. So I trimmed a cake board and put it on top of the bottom layer of cake. I put the flat layer on next then topped it with other round cake. I put a crumb coat on it and put it in the fridge to set while I was waiting on the fondant. Meanwhile I check on the fondant and pull out what I had colored black for the decorations on the ball. I figured that I'd take some gold decorating dust and brush it on the black pieces to make it kind of shiny like the normal Bakugan balls. As I tried to free form cut the shapes I realized that I was in way over my head. So, I scrapped the idea of a fondant covered Bakugan ball shaped cake. I started gathering the ingredients to make a regular chocolate sheet cake. I went to grab the eggs out of the fridge and realized that I had just used all but one of them making the cakes. I was up the creek without a paddle. My baby boy was going to be so disappointed in me. I could have made a middle of the night run to Wal-Mart but I decided against it. Finally, after fighting with the voices in my head (I'm kidding but you know what I mean) I decided to head to bed at 2:45am with the intention of getting up early and trying to salvage the ball shaped cake. The party was to start at 11am and since we were having it at my moms house because she has a pool I wanted to get there at 10am to set up. When I went to bed I figured that I'd get up around 7am and have plenty of time to mess around with the cake or I could just run to the store in the morning and get eggs. I woke up at 8:30am. After running to the store and picking up eggs I realized that I wouldn't have enough time to bake a cake, cool it and then ice it before having to leave to go to my moms. Bring out the fondant! I roll it out and it starts sticking to my counter top. I'm trying to not lose my patience and through a hissy fit over this stupid cake. Finally I get the fondant rolled our and I've got it draped over my rolling pin like a pie crust. I put it over the cake and unrolled it and then my worse fears came to life. It cracked and folded and did everything that I didn't want it to do. I'm almost in tears!! Husband comes in and looks at it and had the nerve to say "can't you fix it?"-huh! As if I had any idea of how to fix it. Then Wyatt comes in and tells me that it doesn't look that bad. His suggestion was that we take the left over fondant and cover up the spots that didn't get covered when I unrolled it and then paint over it. Husband chimes in again with "can't you just cover up the mistakes with icing?"-I proceed to shoot daggers out of my eyes. Finally, after letting a couple tears out I tell Wyatt that we can leave early and go get him a cake from Wal-Mart. No way on God's green earth was I going to serve the Bakugan cake to anyone outside of my house. So, that's what we did. I went and let him pick out a pre-made cake from Wal-Mart and all was well for the party.
I did let them cut into the cake today since it's just been sitting in the fridge in the garage. I made them wait until I could get pictures of the atrocity to share with all of the interwebs. I don't know that I'll be trying to use fondant anytime in the near future. I think I've been scarred for life.
Here's the look we were going for: (sorry, you'll have to follow the link if you want to see)
And here's what we ended up with. I don't know why it looks so pink in the pictures. It wasn't pink in real life. It was more like a pinkish red-apparently my skills for using food coloring stink as well.

Tuesday, June 1, 2010

My weekend cake-a-palooza!

Well, this weekend I was in full out cake making mode. I made three cakes this weekend. It started Sunday afternoon and continued until Monday afternoon. My dad and a co-worker of mine both had their birthdays yesterday. Dad wanted a carrot cake and co-worker loves chocolate. I decided to make a chocolate cake with chocolate icing for co-worker. Not everyone in my family likes carrot cake so in addition to the carrot cake I made a vanilla cake. My mixer was definitely getting a workout this weekend!
I wasn't able to get pictures of the cakes before they were cut in to so I took a couple of slices that were salvaged afterwards and here they are for your viewing pleasure.


Carrot Cake
2 pounds carrots, peeled and finely grated (I put mine in the food processor to save my (knuckles)
3 karge eggs, room temperature
1/2 cup buttermilk
2 cups sugar
1 1/2 cups vegetable oil
1 1/2 teaspoon vanilla extract (or you could use the seeds from a whole vanilla bean)
3 cups all-purpose flour
1 teaspoon baking soda
2 teaspoon baking powder
1 teaspoon salt
1 teaspoon ground cinnamon
1 teaspoon ground ginger
1/8 teaspoon ground cloves

Optional: Raisins, nuts

1. Preheat oven to 325 degrees Farenheit. Spray 3 nine (9) inch round cake pans with baking spray with flour or grease and flour pans. Whish together carrots, eggs, buttermilk, sugar, oil and vanilla. In another bowl, whisk together flour, baking soda, baking powder, salt, cinnamon, ginger and cloves. Stir flour mixture into carrot mixture until well combined.

2. Divide batter evenly among 3 pans. Bake 40-45 minutes or until toothpick inserted in center comes out clean. Transfer to wire racks and let cool 10 minutes, then turn out of pans and let cool completely.

You can top cake with whatever icing you prefer. I used a cream cheese icing and then added nuts around the sides of the cake. I purposely didn't add nuts to the cake batter because I knew I would be adding them to the sides of the cake.

Cream Cheese Icing
1 1/2 sticks of butter softened
12 oz of cream cheese softened (or you could use a brick and a half of cream cheese)
6 teaspoons vanilla extract
6 cups powdered sugar

Cream butter and cream cheese together. Add vanilla until creamy. Add powdered sugar one cup at a time and mix until smooth. The icing recipe will completely cover a three layer cake with some left over.

For the vanilla cake I just used a boxed cake mix and made my own icing. I did channel my inner Amanda (http://iammommy.typepad.com/i_am_baker/) and decide to do something a little different with the cake batter. I used three cake pans and I separated the batter in to 3 bowls. I added red food coloring to one bowl and blue food coloring to the second bowl. I left the third bowl uncolored. I baked the cakes as the box directed and set them out to cool. I wanted a lighter icing for this cake so instead of using a buttercream or cream cheese icing I made a whipped cream icing.


Whipped Cream Icing
1 8 ounce brick cream cheese softened
1/2 cup granulated sugar
1 teaspoon vanilla extract
1/2 teaspoon almond extract
2 cups whipping cream/heavy cream

1. Combine cream cheese, sugar, vanilla and almond extract in a mixing bowl using the whisk attachment. Once combined slowly add in cream, scraping bowl occasionally. Whip until mixture can hold stiff peaks. Apply to cake as desired.

I really liked this icing. It wasn't as sweet as a buttercream or cream cheese icing but was sweet enough to nicely compliment the cake. This recipe for icing covered my three layer cake with about a cup of icing left over. I kept my cake refridgerated until time to serve as a precaution.

The chocolate cake that I made was just a boxed cake mix and a store bought chocolate icing. I was going to make it from scratch but I ran out of time and energy! When I served the vanilla cake to my family they oohed and awwed about it. It took no more energy or time to add a little food coloring to the batter and it made my family feel really special.


Friday, May 28, 2010

Kate's Banana Dessert

If I'm violating any kind of blogger guideline/etiquette by the way that I'm linking back to the recipes that I'm using will someone please let me know? I'm trying to make sure that I'm giving credit to the places/people that I'm getting my recipes from. I just don't want anyone to think that I'm trying to be shady or steal ideas or anything like that. I'm open to suggestions/criticism. Thanks in advance. On to the good stuff...

Earlier this week I was checking in at Kate's blog (http://katesworldbykate.blogspot.com/) and saw this recipe as her Tuesday Treats feature-http://katesworldbykate.blogspot.com/2010/05/tuesdays-treats-banana-cream-squares.html. I'm always looking for something new and exciting to try so I couldn't wait to get the opportunity to test this recipe out. Little did I know that I would get a request to make something new from the men in my house just last night. So, since I'm nothing if not super nice to my family, I ran to the store to get a couple of things that I didn't have in the house to get the recipe rolling. Once I got the crust in the oven I was getting together the remainder of the ingredients to finish up the recipe. I grabbed a can of sweetened condensed milk out of my pantry and opened it up. Now, I don't know how often you use sweetened condensed milk but apparently I don't use it that often. When I opened the can the milk was a really weird brownish color. I asked my husband if that was what it was supposed to look like and he wasn't sure. So, I did what any other social networking woman would did-I sent a tweet out and waited for a response. And waited some more. Finally I decided to scrap the recipe making for the night because I didn't want to take the risk of poisoning my family. I checked the can to see exactly how old the condensed milk was and to my horror it was from 2007. Another lesson learned-you can't keep sweetened condensed milk for three years!


When I came home from work today I finished making the filling for the banana cream squares and stuck it in the fridge. I left it in there for a couple of hours mainly because I was too busy to get to it between having dinner and going grocery shopping. At this point I did stray from Kate's recipe a little bit. Last night when I made the crust I put the crust crumbs in the oven so that I could use them as a topping like the recipe called for. I must have seen something sparkly in the meantime because the crumbs got a little browner in the over than I would have liked. So tonight when I was putting the dessert together I decided to put my own twist on it. I took some 'Nilla Wafers and crushed them up and put them on top of the pan of banana cream squares. Since I have a healthy appreciation for whipped cream I decided to put a spoonful on top of the squares too.


I was really happy with the end result. My husband and the kids both liked the new "creation". To me it had a perfection combination of sweetness without being overpowering. I can't wait to see what Kate's going to cook/bake up for next week.


Thursday, May 27, 2010

Need some suggestions...

So I'm having a House Party Game Night http://www.houseparty.com in a couple of weeks. I need ideas for what kind of food to servce. We're expecting about 20-25 people (half adults, half kids). I had thought about just doing appetizers but then I realized that the party is going to start at 6pm. That's dinner time for most families so I need to have something more substantial than just chips and dip without having a sit down dinner for 20 some people. So if you have a tried and true recipe or even just an awesome idea leave it in the comments. Thanks!

Tuesday, May 25, 2010

This year in pictures

Here are a few pictures of some of the cakes that I've made so far this year.

I made these two cakes for Easter. (Obviously-sorry!) The bunny cake is our annual traditional Easter dessert. This year I decided to make sure that we all remember what Easter is really about thus the cross cake.

I made this one for a friend/co-workers birthday along with another cake that's too un-pretty to show here.

This one was for my mother in law's birthday a few weeks ago. She requested that I make her birthday cake using my "special" buttercream icing. I tried to be all professional with the dots on the sides. I didn't like the way it turned out but I did figure out a better way to do the dots so that they line up better.

My first attempt(s) at roses and petals. For some reason I'm incapable of centering my cakes on cake boards. I don't know why that is. My cakes always end up with one side showing more of the board than the others. I'm thinking it could be because I'm using cake boards that are bigger than the cakes I'm making.
So there you have it. A few pictures of some of the cakes I've made in the past few months.

Monday, May 24, 2010

Pound cake and a lesson learned...

Well, I made it through day one! Thank you so much for all of your kind comments. I'm going to make my way to everyone's blog as I get a chance. This whole blogging thing has been really exciting and kind of scary all at the same time. I thought that I'd be out in the blogosphere talking to myself for a while. Luckily, I have all of you to talk to now. I really couldn't be happier.


I decided to try making pound cake tonight. I used this recipe from Bakerella http://www.bakerella.com/pound-cake-and-petit-fours/ for my adventure. Well, really there was a lack of adventure in the pound cake department. I liked the way it came out and so did my husband. I've only made pound cake one other time and that experience was a nightmare. I used a really big aluminium loaf pan and the pound cake was raw in the middle when I took it out. Definitely not appetizing!


Obviously I'm still honing my photography skills. Hubs just told me that he'll take pictures for me so I might try that next time.

Now for my PSA-if you are making a roast in the pressure cooker and decide that you want to add a can of Coke to make the meat more tender add a bunch of beef stock or water. If you don't you'll end up with a burnt, nasty smelling roast. I may know this from experience. Then again I may not. I actually realized that the roast wasn't smelling as tasty as it usually does and it was starting to smell like burnt sugar. Yeah, that's exactly what it was happening. All of the sugar in the Coke had evaporated leaving no liquid left in the pot. Coke will tenderize meat but since I was using the pressure cooker and not the crock pot I should have added more water or stock. Luckily we got to it before the roast was ruined. All it took was 20 minutes of scrubbing the bottom of the pressure cooker and starting over with lots of stock. Let me be your example-your family will thank you!!

Sunday, May 23, 2010

Well, here I am!

After much consideration I decided that I'm going to dive in and start blogging. Who knows where this is going to go or what's going to happen along the way. I welcome any comments or suggestions.

Today I wanted to attempt making cookies like I've seen over at Amanda's blog http://iammommy.typepad.com/i_am_baker/ . Her cakes and cookies are gorgeous! My other source for information was Kate at http://katesworldbykate.blogspot.com/ . Kate's got a couple of recipes that I hope to try out soon.

I started with Amanda's recipe for sugar cookies. I also used her icing recipe. I followed the directions exactly and refridgerated my dough for an hour but when I took it out and went to roll it out things started to go wrong. In my effort to not destroy my kitchen this afternoon I decided to roll the dough out between two sheets of wax paper and then transfer the cookies to the baking sheet. But when I went to move the cookies the lost their shape and looked like big blobs. So I figured that I'd just roll the doug out on the cookie sheet and remove the excess from around the shapes I was using. I did that but my dough rolling techinque must need some work because I had a circle of cookies and nothing at either end of the cookie sheet. I went ahead and put the first sheet in the oven for six minutes. When the timer went off the cookies weren't done so I left them in the oven for two more minutes. After that I took them out and let them cool. The only problem was that I didn't anticipate how much the cookies would spread out during the baking process. After they cooled I just took the cookie cutter and re-cut the cookies. That seemed to work out okay for me.

While the first batch of cookies were baking I went ahead and put the cookie dough in the freezer. My thought that maybe it didn't get cold enough originally. When I took it out a little while later it was a lot firmer and rolled out better. I still think that there has to be an easier way. I'll have to consult The Google to see what I can find out.

I didn't really have any issues with making the icing. The recipe was really easy to follow. Once I started to do the outlining on my cookies I realized that I probably should have made the icing a little thicker to begin with because it was really runny/thin. This is how we learn! After the border dried I filled in the centers of the cookies. I've got a lot to learn to make my cookies look as good as Amanda's and Kate's but at least I've got my feet wet.


Here are some pictures of my finished products.


I've got to play around with my lighting and using the flash on my camera etc.